Widget API
Configuring the Widget via the API
The easiest way to configure the appearance and behavior of the Now4real widget is through the visual editor in the Dashboard, which lets you preview changes and deploy them instantly across your site. However, there are scenarios where you might need to override the widget configuration on specific pages or control it dynamically through code (e.g., for DevOps pipelines). In these cases, the Now4real API allows developers to configure the widget programmatically.
Setting up the widget configuration
To configure the widget via the API, replace the “magic line of code” with the following script:
<script type="text/javascript">
  window.now4real = window.now4real || {};
  now4real.config = {
    widget: {
      color_external_background: '#39AAE1',
      color_external_text: '#FFF',
      color_internal_background: '#39AAE1',
      color_internal_text: '#FFF',
      align: 'left'
    },
    scope: 'page'
  };
  (function () { var n4r = document.createElement('script'); n4r.type = 'text/javascript'; n4r.async = true; n4r.src = 'https://cdn.now4real.com/now4real.js'; var s = document.getElementsByTagName('script')[0]; s.parentNode.insertBefore(n4r, s); })();
</script>
The key area to modify is the now4real.config object, where you can customize properties such as colors, alignment, and behavior. Additional properties can also be added to suit your requirements.
Main configuration properties
- widget: Defines the visual aspects of the widget, such as colors and alignment. For example, the script above sets a blue-and-white theme and aligns the widget to the left.
- scope: Determines whether the widget creates a unique pagechat for every page (‘page’) or a single site-wide chat (‘site’).
- ‘page’ creates a unique pagechat for each page on the site. Chat messages posted by visitors are visible only on the specific page where they were sent, and not on other pages. The widget bubble displays two counters: the number of viewers currently on that page and the total number of viewers across the entire site.
- ‘site’ (the default value) creates a single, site-wide pagechat that is shared across all pages of the site. Chat messages posted on one page are visible on every other page. The widget bubble displays only the total number of viewers currently on the entire site.
Use ‘site’ for smaller audiences to foster connections across pages. For sites with more visitors, ‘page’ keeps conversations relevant to specific content. In the latter case, you can either let Now4real determine the page context based on the current page path, or pass your own context to get full control over the chat contexts (see the page_context property).
Example configuration
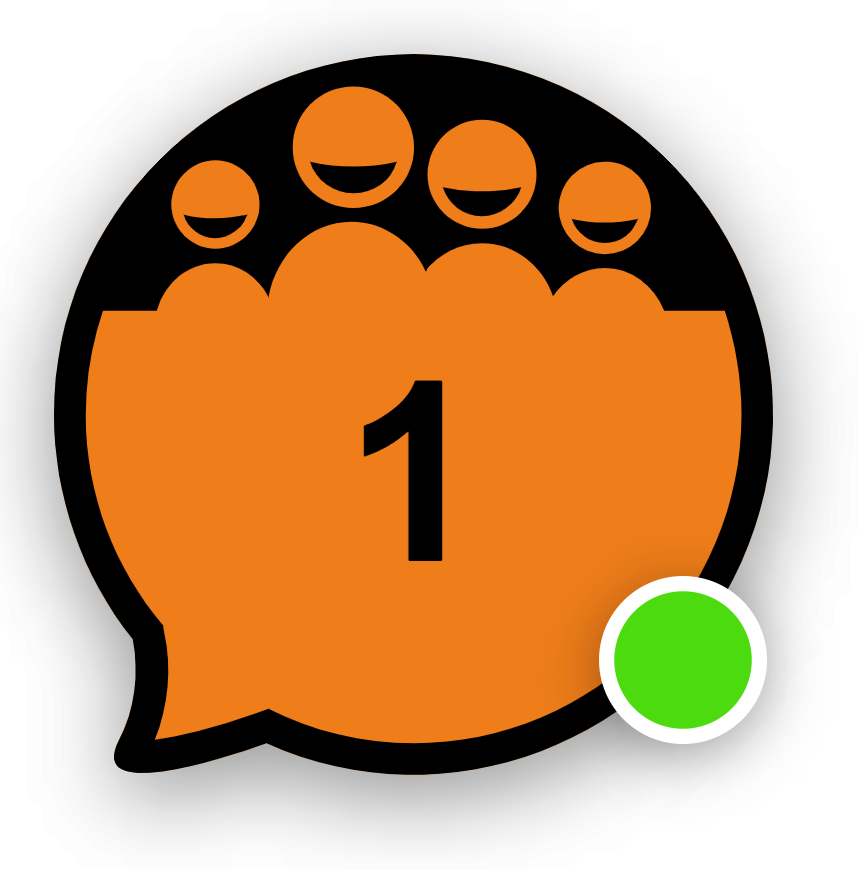
Let’s say you want to customize the widget with a black-and-orange color scheme, align it to the right of the page, and set the language to Spanish. You also want to switch the scope to ‘page’. Here’s how your script would look:
<script type="text/javascript">
  window.now4real = window.now4real || {};
  now4real.config = {
    widget: {
      color_external_background: '#F66F00',
      color_external_text: '#000',
      color_internal_background: '#000',
      color_internal_text: '#F66F00',
      align: 'right',
      language: 'es'
    }
  };
  (function () { var n4r = document.createElement('script'); n4r.type = 'text/javascript'; n4r.async = true; n4r.src = 'https://cdn.now4real.com/now4real.js'; var s = document.getElementsByTagName('script')[0]; s.parentNode.insertBefore(n4r, s); })();
</script>
The resulting widget, in its closed form, will look like this:
Embed the widget in a page
If you prefer to embed the chatbox directly into a page rather than displaying it as a popup overlay, define a <div> element in your HTML as a container.
For example:
<body>
    ...
    <div id="n4r-wrapper" style="width: 50%; height: 600px;"></div>
    ...
</body>widget: {
container: 'n4r-wrapper'
}The widget will automatically resize to fit the dimensions of your <div>.
Explore additional properties
The widget object offers numerous properties to control various aspects, including logos, welcome messages, attention grabbers, and more. Some key properties include:
- align
- align_mobile
- horizontal_distance
- horizontal_distance_mobile
- …
- logo_url
- chat_bubbles
- container
- chat_enabled
- …
- language
- attention_grabber_enabled
- attention_grabber
- consent_message
The complete list of properties can be found in the API documentation under the Config object. Look for the widget property, where the fourth column outlines all the available widget customization options.
Note: Certain advanced properties, such as custom logos or attention grabbers, are only available in premium plans. Refer to the API documentation for a complete list of properties and their descriptions.
Add Now4real to your site today
Easy. Free. Instant.
Let visitors chat, discover hot pages, and build instant communities—right on your website.

Details and disclaimer